Setting up the Pinecone MCP server in your IDE
In this blog post, I'll show you how to avoid the IDE-docs-console-app shuffle by adding the Pinecone MCP server to your IDE. You'll be able to search the official Pinecone docs and create and manage indexes without flipping back and forth between apps.
Want to prototype and test your Pinecone indexes, right from your IDE?
In this blog post, I'll show you how to avoid the IDE-docs-console-app shuffle by adding the Pinecone Developer MCP server to your IDE. You'll be able to search the official Pinecone docs and create and manage indexes without flipping back and forth between apps.
You'll need a couple bits set up first:
- A Pinecone API key
- Node.js installed with
npmandnpxon your path
Add the Pinecone MCP server to your IDE
Let's connect an IDE, in my case Cursor, to the Pinecone MCP server. We'll create an mcp.json file in the .cursor directory, paste in the code below, and replace YOUR_PINECONE_API_KEY with your Pinecone API key.
{
  "mcpServers": {
    "pinecone": {
      "command": "npx",
      "args": [
        "-y", "@pinecone-database/mcp"
      ],
      "env": {
        "PINECONE_API_KEY": "YOUR_PINECONE_API_KEY"
      }
    }
  }
}
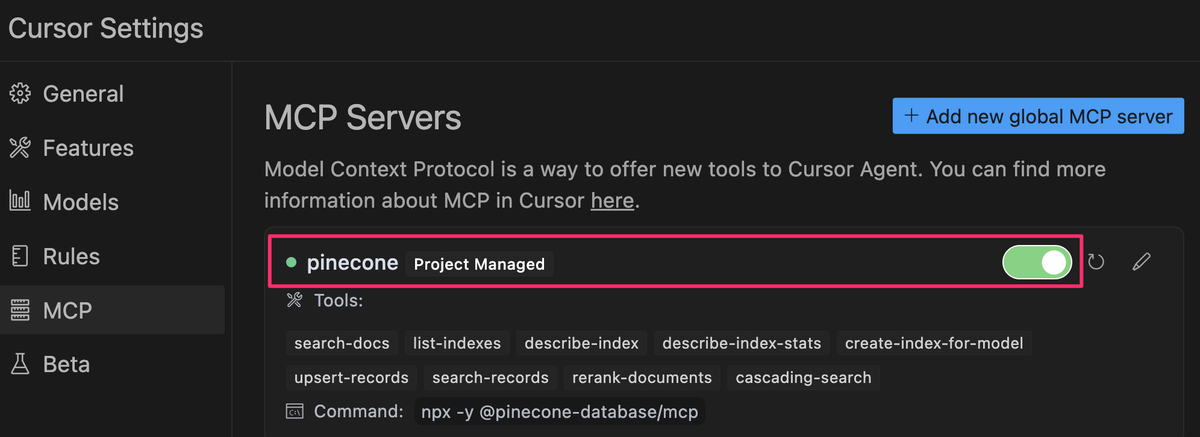
Check the config status
We'll now check the config status in Cursor to make sure it is connected to the server and the tools are available. Notice how the connection status turns green when connected.

Add the Pinecone rules for Cursor
Next, we'll add these extra special Pinecone rules for Cursor, to guide it to even better results, making sure it's using the latest stable version of the Pinecone SDK and searches the official docs.
### Tool Usage for Code Generation

- When generating code related to Pinecone, always use the `pinecone` MCP and the `search_docs` tool.

- Perform at least two distinct searches per request using different, relevant questions to ensure comprehensive context is gathered before writing code.

### Error Handling

- If an error occurs while executing Pinecone-related code, immediately invoke the `pinecone` MCP and the `search_docs` tool.

- Search for guidance on the specific error encountered and incorporate any relevant findings into your resolution strategy.

### Syntax and Version Accuracy

- Before writing any code, verify and use the correct syntax for the latest stable version of the Pinecone SDK.

- Prefer official code snippets and examples from documentation over generated or assumed field values.

- Do not fabricate field names, parameter values, or request formats.

### SDK Installation Best Practices

- When providing installation instructions, always reference the current official package name.

- For Pinecone, use `pip install pinecone` not deprecated packages like `pinecone-client`.
You can customize this to your own situation, depending on how you work. I've set mine to Agent Requested and given it a description of Used when generating code related to Pinecone so the agent knows when to include the rule. You can read more about this here.
Try it out
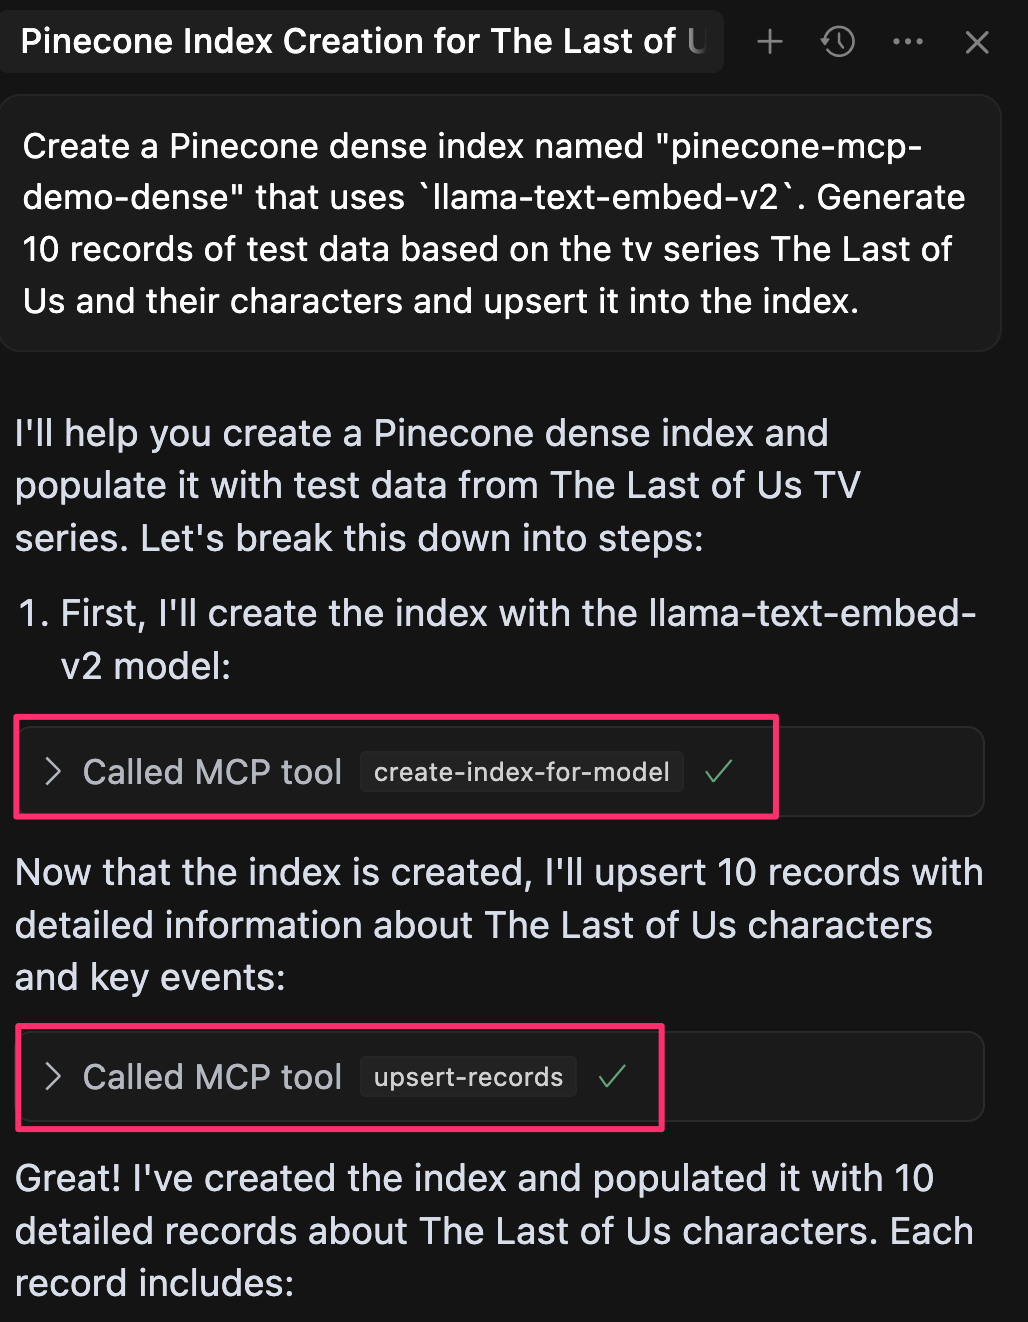
Here's the best part - creating and testing your first Pinecone index right in your IDE. I use this prompt to build an index based on Last of Us storylines:
Create a Pinecone dense index named "pinecone-mcp-demo-dense" that uses `llama-text-embed-v2`. Generate 10 records of test data based on the tv series The Last of Us and their characters and upsert it into the index.
The Cursor agent knows to make the call to the Pinecone MCP server to create the index and then to search records.
This feedback loop lets me quickly iterate on config, test data, and vector search.
And yes, I'm currently watching the Last of Us, so no spoilers!
Now that I've prototyped and tested my index, I can start building my app, using the Pinecone MCP tools to search the docs, manage my test data, all right from my IDE.
Wrapping up
If you'd like to check out how to configure the Pinecone MCP server with other IDEs, check out this guide.
I hope this has been helpful! If you have feedback or want to share how you're using the Pinecone MCP server in your development workflow, drop a note in the comments.